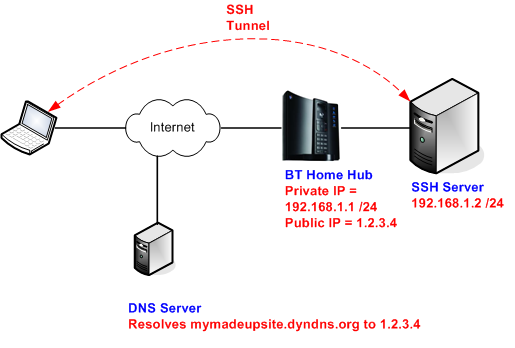
1. Register with a free DNS service such as dyndns ( http://dyn.com/dns/dyndns-free/ ). Here you register a hostname ( e.g.mymadeupsite.dyndns.org ) and then install an update client (http://dyn.com/support/clients/windows/) on a PC on your internal network. Your PC will periodically talk to dyndns and update it with the public IP address dynamically assigned to you by BT. Alternatively you can get your Homehub to do the updating. On your homehub go to Settings (enter your password) --> Advanced Settings --> Continue to Advanced Settings --> Broadband --> Dynamic DNS. Here you can enter your dynamic DNS details and the Homehub will periodically update Dynamic DNS with your public IP address.
Then by the magic of DNS mymadeupsite.dyndns.org will resolved to your BT home hub public address. This first step is not essential and you can just access your hub via IP address but that can change over time and if you are away from home and the address changes you won't be able to find out the public address.
2. From your home network login to your homehub - I am not going to explain this part - if you don't know how to do this you are probably already out of your depth ;).
Go to Settings (enter your password) --> Advanced Settings --> Continue to Advanced Settings --> Port Forwarding. In the"Game or Application" drop down box select "Secure Shell Server (SSH)" and in the "Device" box select the device you want to port forward to. On my network this is a Linux box running Ubuntu. If you do not have a *nix server then you need to install some brand of SSH server on a device on your network. Sorry if this part is a bit sketchy - I have never tried this with a Windows SSH server - you could try this: http://sshwindows.sourceforge.net. Click on Apply to save the settings. What we have done here is to tell the home hub to forward anything destined for TCP port 22 to the internal device you have specified.
3. This is the "internal" bit set up. Now we try and access it from the outside (e.g. from a corporate network or public WiFi). So you should be carrying out the following steps on a PC outside of your network - it will not work from the inside.
Download putty (http://www.chiark.greenend.org.uk/~sgtatham/putty/download.html) and install it. Putty is a brilliant client program which has the ability to create SSH tunnels. Open putty and in the hostname box put your dyndns hostname in mymadeupsite.dyndns.org. Make sure that the radio button for "SSH" is selected. Put mymadeupsite.dyndns.org in the "Saved Sessions" box and click on save - this will store the session for future use. Click on "Open" and (fingers crossed) you should get a login prompt from the SSH server on your internal network. Login with the necessary credentials.
4. So now you are logged in to your home network - just one more step to go... Close down your putty session and restart it. Highlight mymadeupsite.dyndns.org entry in the list and click load. Now on the left pane headed "Category" you should see a section under "Connection" marked "SSH" with a subsection of "Tunnels". Click on this and you will see the SSH port forwarding screen. This is the clever part - in the bottom section where it says "Add new forwarded port:" put in 80. In the "Destination" box put in the IP address of your home hub. This is the internal address of your hub and will probably be something like 192.168.x.x. If you don't know what it is go to a PC on your home network and from a command prompt type "ipconfig" and look for the entry marked "Default Gateway". So assuming that your homehub address is 192.168.1.1 you would type in the destination box "192.168.1.1:80". Click on "Add" then click on "Apply" and then click on "Session" on the left pane (you might need to scroll up) and click on "Save". Now click on "Open" to connect to mymadeupsite.dyndns.org again and login. Now, after you have logged in open up your browser and in the address bar type http://127.0.0.1. And (more fingers crossed) you should hit the login screen of your homehub. The port forwarding aspect is very flexible and you can add multiple port forwarding rules for all kinds of different services, not just http. I use it for SCP, VNC, even daapd. It is important to keep the putty session open while you are doing whatever you are doing - closing the putty session will kill the associated tunnel.
It doesn't work?
There are lots of places where this can go wrong - common problems I have run into.
- The IP address registered to dyndns is wrong.
Make sure you have the client part installed on your PC and that it is updating. Dyndns has a useful admin facility where it will show you when your host was last updated. I have found that if you don't reboot your homehub the IP address stays the same most of the time. Login to your homehub and compare the public IP address to the one dyndns thinks you have.
- Tunnels don't always work
I see this quite often and it looks like a quirk in putty. Sometimes the SSH session will be established OK and tunnels to certain devices will work and others won't. If you go to the "Tunnels" section in putty, highlight the problem tunnel and click "Remove" and then click "Add" and then click "Apply" seems to magically bring it back to life.
- SSH not permitted
This is a real pain and but there is a way around it. Some corporate networks will only allow certain outbound traffic (usually http and https) and nothing else so when you try and initiate an outbound SSH connection (port 22) it is blocked at the firewall. On the home hub there is a section in port forwarding called "Supported Applications" where you can have custom forwarding rules. What you can do here is create a rule which says anything received on port 443 should be forwarded to port 22 on the internal network.
- A word about ports...
When you configure a tunnel in this manner what you are actually doing is telling your PC (the one running the putty client) to listen on a given port (e.g. port 80) and then forward anything received on that port to the destination specified through the SSH tunnel. As such that port has to be available; so for example if you were running an http server on port 80 on your PC you could not use port 80 for a forwarding rule. This is easy to circumvent though - the port you listen to on your PC does not have to be the same as the destination rule. For example in the source port section you could have port 81 and in the destination field you could have 192.168.1.1:80. Then in your browser you would just type http://127.0.0.1:81 which would automagically be forwarded to 192.168.1.1:80. This also allows you to access multiple hosts on your internal network which use the same port. A useful troubleshooting tool here is netstat which shows which services are bound to which ports on your PC. Try netstat -b which also show you the executable file which is running that service - anything bound to putty should show as below:
TCP MYPC:81 MYPC.MYNETWORK:4298 ESTABLISHED 4760 [putty.exe]